
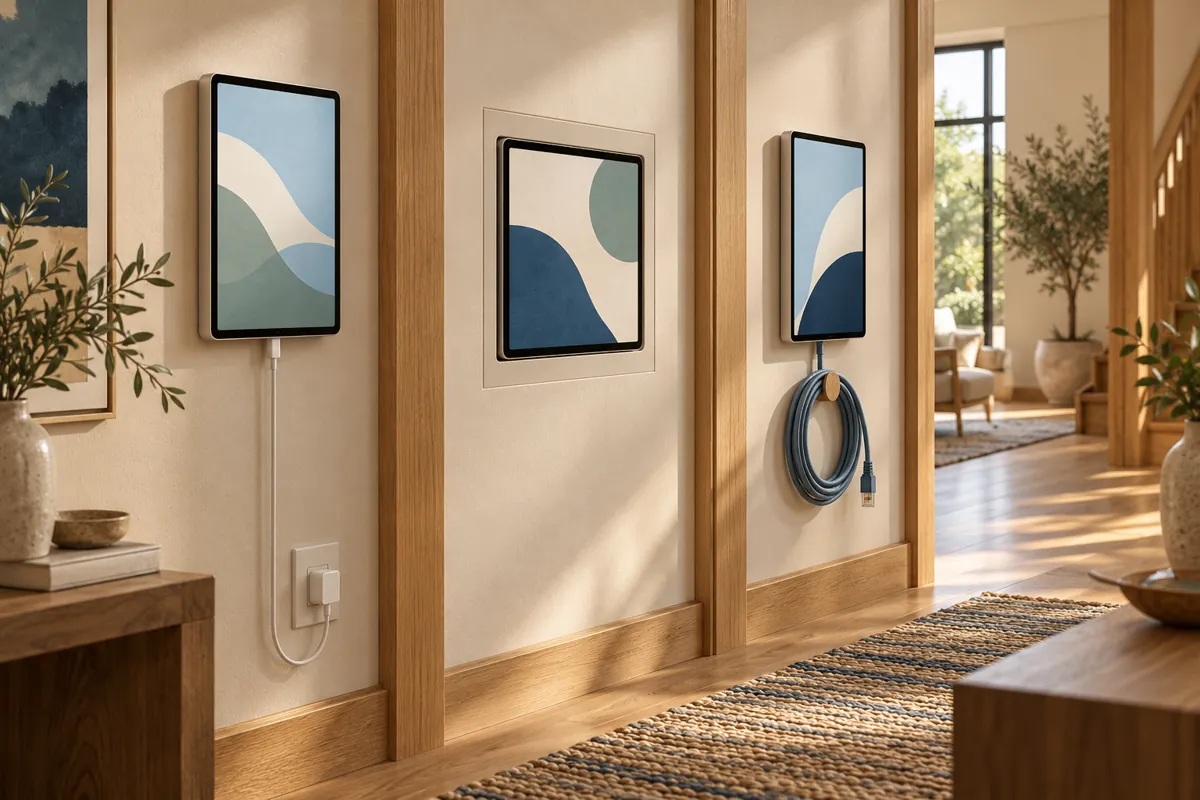
Apple HomeView wall mounts should be compared as complete power routes, not just brackets. The documented Schneider options use an external USB-C adapter, household AC wiring or Power over Ethernet. Choose the route that fits the wall and existing infrastructure before comparing the mount prices.
On this page
- HomeView wall mounts at a glance
- USB-C: best considered when an outlet is already useful
- AC wired: a cleaner appearance with a different project scope
- PoE: evaluate the network route as well as the mount
- Compare complete hardware totals
- A route selection method that avoids premature purchases
- Three example rooms, three plausible choices
- What a product recommendation must establish
- Before you order
- Include support responsibility in the comparison
- USB-C $358.95Display + mount; add adapter, tax and other work
- AC $378.95Display + mount; add assessed installation and tax
- PoE $428.95Display + mount; add network equipment and work
- Reference snapshotUS prices Oct 14, 2026; PoE announced early 2027
The cheapest mount does not always produce the cheapest installation. A nearby outlet, a suitable wall box or an existing network cable can change the result. Count the missing parts in your actual room.
HomeView wall mounts at a glance
The three listed mounts are designed for Apple HomeView’s wall model. That exact compatibility matters. A generic tablet bracket or magnetic holder should not be treated as equivalent without evidence about fit, retention and the power connection.
Apple’s listings identify the USB-C connector, AC wired mount and PoE wired mount. US reference prices below were checked on October 14, 2026. Shipping, tax and installation are separate.
| Route | Listed mount price | Main requirement | Planning advantage |
|---|---|---|---|
| USB-C wall connector | $59.95 | Suitable external adapter and nearby outlet | Avoids line voltage wall wiring for the listed installation |
| AC wired mount | $79.95 | Suitable single gang box and qualified electrician | Conceals the power route at the display |
| PoE wired mount | $129.95 | Compatible PoE equipment and Ethernet route | Plans power and wired data through network infrastructure |
The PoE route is announced for early 2027. A product listing is not proof that an order will ship immediately. Keep timing separate from the technical comparison.
USB-C: best considered when an outlet is already useful
The USB-C mount uses a supplied cable to reach an external power adapter. Its listing specifies a two meter cable and a minimum 20W USB-C adapter, sold separately. Measure the route rather than assuming the nearest outlet is close enough.
Follow the actual cable path around furniture and trim. A straight line measurement through the air can understate the length needed. Leave practical room for the connector without pulling the cable tight.
This route avoids the listed AC mount’s line voltage work. It can suit a home where a visible cable is acceptable and the outlet is already well placed. It does not make every wall or fastening method suitable automatically.
Review the power adapter checklist before reusing a charger. The connector shape is only one part of the decision. Check output, condition and the way the port will be used.
AC wired: a cleaner appearance with a different project scope
The AC mount uses household wiring through a suitable single gang wall box. The listed design delivers power to the display through the mount. It is a different project from plugging an adapter into a nearby receptacle.
Use a qualified electrician for the line voltage work. Ask them to assess the existing box, power route and local requirements. This guide compares routes; it does not provide instructions for wiring mains conductors.
Include wall repair and finishing in the quote if a new location is needed. A clean final appearance may require more work than attaching the visible hardware. Request a complete scope rather than a mount only price.
This route can be sensible when suitable infrastructure already exists or when the room is being renovated. It may be unnecessary for a rental or a location that still needs experimentation. Permanence should serve a proven household routine.
PoE: evaluate the network route as well as the mount
The listed PoE mount is designed to supply power and wired Ethernet data. That distinction matters because generic power converters do not automatically provide both. An Ethernet cable by itself also does not mean power is available.
Inventory the equipment at the other end of the cable. Record the switch or injector model, available port and cable destination. If nobody knows where the wall cable goes, tracing it is an early project task.
Budget for missing network hardware and installation work. A household with a useful existing cable route can have a different total from one starting from scratch. Compare those real conditions rather than assuming PoE is always inexpensive.
The Apple HomeView PoE guide covers output and data questions in more depth. It also explains why an adapter intended for another device may not meet Apple HomeView’s requirement. Keep the planned early 2027 timing in the decision.
Compare complete hardware totals
Using the announced $299 wall display price, the listed mount routes start at $358.95 for USB-C, $378.95 for AC and $428.95 for PoE. These are simple sums of display and mount reference prices. They are not finished installation quotes.
The USB-C route still needs an appropriate adapter unless you can reuse one. AC needs the assessed electrical work. PoE needs suitable network equipment and a usable cable route.
Our cost calculator keeps those extras separate. Enter your own adapter, equipment and labor amounts. This makes reuse visible instead of hiding it inside an assumed package price.
Do not add a generic labor estimate as though it applies to every home. Wall material, access and local work requirements vary. An actual quote is stronger evidence than a broad online average.
A route selection method that avoids premature purchases
Before ordering HomeView wall mounts, first choose a useful screen location. Test its height and viewing angle with a temporary marker. If the position is awkward, selecting a clever mount does not fix the underlying problem.
Next list the existing infrastructure at that location. Mark a reachable outlet, a suitable assessed wall box or a traced Ethernet run. A route with fewer missing pieces deserves attention before a more elaborate alternative.
Then identify the person responsible for installation and maintenance. A plug in arrangement and a network powered arrangement can have different support needs. Choose a route the household can understand and maintain.
Finally compare the total and timing. If the preferred mount arrives later than the display, decide whether waiting is acceptable. Avoid buying two routes just because the final plan was not made before ordering.
Three example rooms, three plausible choices
Consider a hypothetical hallway with an outlet near the proposed display. If the supplied cable reaches neatly, USB-C may be the simplest documented route. The household can assess the visible cable before making a permanent commitment.
Consider a renovated entrance with an electrician already working on the room. An AC installation can be evaluated as part of that project. The quote should still include the exact mount and finishing requirements.
Consider a home with a managed network and a traced Ethernet run at the desired position. PoE may fit the infrastructure well. That household must still confirm equipment compatibility and wait for actual availability.
These are selection examples, not declarations that a route is universally best. The same room name can conceal very different walls and equipment. Use the conditions, not the label, to choose.
What a product recommendation must establish
Recommendations for HomeView wall mounts need exact model support, the power path, included parts and installation requirements. They should also state what is not included. Price alone is insufficient evidence.
For unlisted cheaper mounts, require clear manufacturer documentation and a credible installation method. Do not infer safety or fit from a photograph of a similar square display. A low price is not proof of compatibility.
At this stage, the documented Schneider routes provide a clearer evidence base than speculative alternatives. We have not tested their physical retention or installation experience. Official merchant links are provided for verification, not as a claim of hands on endorsement.
For practical placement and installer questions, use the wall installation guide. It complements this route comparison rather than repeating a shopping list. The right mount is the one that completes a useful, maintainable installation.
Before you order
Confirm that you are buying the wall display model and its matching mount. Save the current listing, included parts and quoted work scope. Check the delivery estimate directly with the seller before scheduling installation.
Keep the adapter or network equipment choice tied to that route. Mixing parts from different plans creates avoidable uncertainty. If the wall position changes, repeat the infrastructure check before reusing the original budget.
After installation, verify ordinary controls, network connection and service access before closing the project. A neatly mounted screen still needs a working household setup. Complete function, appearance and maintenance access belong in the same acceptance check.
Include support responsibility in the comparison
Record who supports the mount and who supports the display. Third party accessories can have separate warranty and service arrangements. Keep both purchase records instead of assuming one device warranty covers the whole installation.
For installed routes, also record the contractor’s work scope. A hardware problem and a wall installation problem may need different help. Clear responsibility is useful when a low initial price omits commissioning, finishing or later support.